Pantheon

Skipping WordPress Background Updates

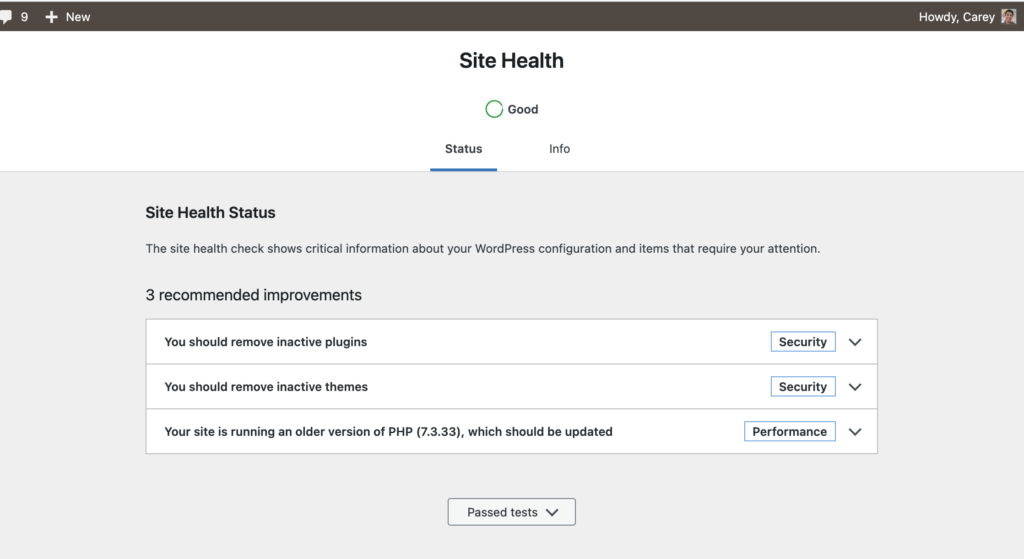
What is Site Health?

The WordPress admin interface is designed to assist end-users in self-servicing their sites by addressing typical setup difficulties and other aspects of maintaining a healthy online presence. It also gives developers a consistent place to store debugging information.

SiteHealth Dashboard

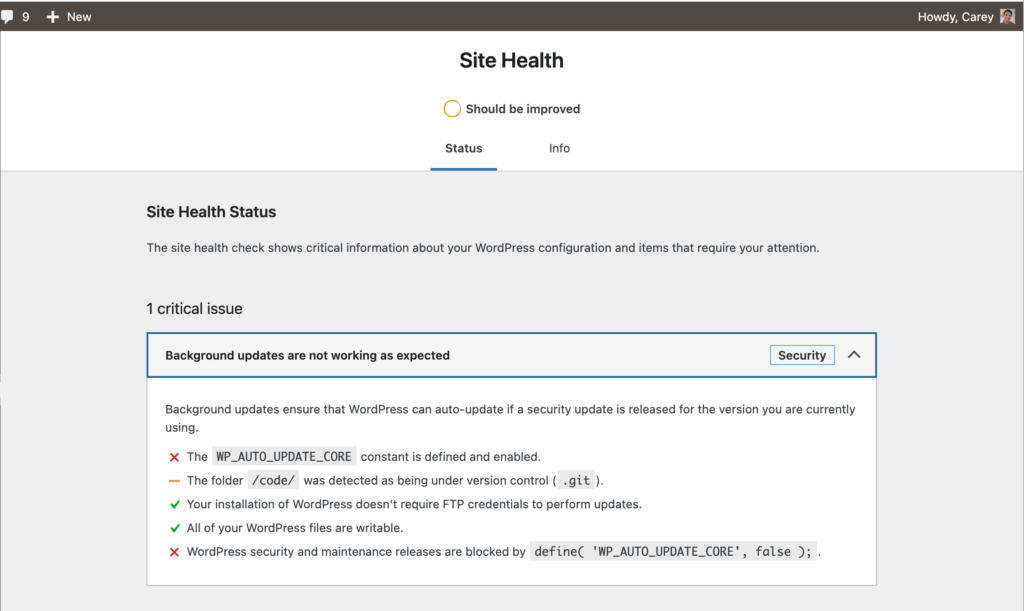
Why the need to skip background updates?

Some hosts, specially Pantheon.io handle the core updates by means of applying upstream updates, or in some common practice, more sites are now in version control using git. Site owners don’t want to ignore the whole time and miss out on potential problems.

Code snippet to skip the update

Create a file named sitehealth.php put it in wp-content/mu-plugins and put these lines of code.

<?php
/**
 * Plugin Name: Sitehealth 
 * Plugin URI: https://github.com/careydayrit/
 * Description: Skip core update on sites using Git
 * Version: 0.1
 * Author: Carey Dayrit
 * Author URI: https://careydayrit.com/
 *
 * @package sitehealth
 */
 
add_filter('site_status_tests', 'skip_background_updates_tests', 10, 1 );


function skip_background_updates_tests($tests){
    unset($tests['async']['background_updates']);
    return $tests;
}

Team Management through Pantheon Terminus

Required Reading: https://pantheon.io/docs/terminus

What is Terminus?

The Terminus command-line interface provides advanced interaction with Pantheon. Terminus enables you to do almost everything in a terminal that you can do in the Dashboard, and much more. This article listed several commands in Terminus 2 that can be used in managing a site’s team using Terminus. First thing first, in all terminus commands we should know how to identify a site to manage it properly.

Getting the Site ID

The site id is an identifier of the site used to route and used by the Pantheon platform to identify the site’s dashboard. To get the site_id you need to login into Pantheon and pick the correct site, to be on the dashboard.

dashboard
URL of Pantheon Site Dashboard

Getting the Site Name

The site name is a machine name, which is a readable name used also to identify a site in Pantheon. The site name is used mostly with the platform URL.

List all team members

terminus site:team:list 

Displays the list of team members for a site. 

site:team:list [–format FORMAT] [–fields FIELDS] [–field FIELD] [–] <site_id> or <site_name>

The command accepts the <site_name> or the <site_id> of the Pantheon site.

The arguments –field and –fields are mostly the same, the difference is the field is just a single field while fields are a group of fields separated by comma(,).

  • email: Email
  • role: Role
  • id: User ID
  • is_owner: Is owner?

The available formats are, without the –format option the default is a table.

  • csv
  • json
  • list,
  • null
  • php,
  • print-r
  • sections
  • string
  • table
  • tsv
  • var_export
  • xml
  • yaml

Add a member

terminus site:team:add

Add a user to the site’s team list.

site:team:add <site_id/site_name> <member> <role>

The member argument should be an email if the email is not associated with a Pantheon account, an invite will be sent.

The role has two choices

  • developer
  • team_member

Change member role

terminus site:team:role

Update a member role on the site’s team.

site:team:role <site_id/site_name> <member> <role>

This command has the same arguments as the add member command but this would only change the role of a user on the site’s team.

Remove a member

terminus site:team:remove

site:team:remove <site_id/site_name> <member>

Removes a member from the site’s team

Filezilla on Pantheon

FileZilla is an FTP client that allows you to upload and import files to and from the Pantheon server. This app allows you to copy several files at the same time. It is a cross-platform software that is available on Windows, Mac OS, and Linux.

This article will walk you through the steps of downloading and uploading your WordPress or Drupal site on Pantheon.

Download Filezilla

If you don’t already have FileZilla installed, grab the most recent update and install it on your computer.

Start Filezilla

Start FileZilla by looking for the application on the start menu or search bar on Windows, on the applications folder on Mac OS, and search for Ubuntu. Keep in mind that Pantheon uses a non-standard port for SFTP, and the protocol must be SFTP rather than FTP.

Create a New Site

Click the Site Manager Icon, that would be the Icon under the File menu.

This would prompt the Site Manager window that would allow a new connection to be made on Filezilla.

Click the New Site button and put details from the Site Dashboard Connection Info from Pantheon. Use the password that is being used on Pantheon User Dashboard. Make sure the Protocol is in SFTP and is using port 2222.

Select to accept the server’s host key for the current session so it is stored in the cache. This will allow you to connect to the server and manage your files for the current session.

To get to the site’s root simply navigate to the code folder and you will be able to continue managing your files as normal.

Installing WP Rocket on Pantheon Platform

Some people do find a hard time installing WP Rocket on Pantheon since it creates files on a write-protect folder set by Pantheon Platform.

The solution was to create a symlink and point to the write permitted folder which is the wp-content/uploads folder.

Please take note that this step is not recommended to be used on any SFTP app but only on the SFTP command line. Since creating symlinks over SFTP have inconsistencies between clients. The process below was tested using MacBook Pro (Mojave), Ubuntu 18.04.4 LTS, and Windows 10 (Release 1909)

  • Create a folder cache and wp-rocket-config on wp-content/uploads folder on DEV first (later would be TEST and LIVE).
  • Remove the wp-content/cache folder. If there is a wp-content/wp-rocket-config folder, remove it also.
  • Create a symlink via the terminal command line.

Note: Be sure that you are in the wp-content folder.

$ ln -s ./uploads/cache cache
$ ln -s ./uploads/wp-rocket-config wp-rocket-config
  • Commit and push the symlink via git.
  • Create the folder cache and wp-rocket-config in wp-content/uploads​ for TEST and LIVE.
  • Commit and deploy code to TEST and LIVE.
  • Activate the WP-Rocket plugin and apply the license code.

Hopefully, this will help users install the WP-Rocket Plugin on the Pantheon Platform.

Happy Coding.

Installing Terminus on Windows using WSL 2

What is WSL? It stands for Windows Sub System for Linux. A Linux-compatible sub-system without having a need for a virtual machine. Though not entirely compatible that would run all the Linux commands and features it is good enough to install Terminus, the command-line tool from Pantheon.io.

A note of warning, since this instruction would require installing WSL, there is an article from TrendMicro a security flawed attack better read this first to be aware https://www.trendmicro.com/vinfo/us/security/news/cybercrime-and-digital-threats/bashware-attack-targets-windows-system-for-linux-wsl .

If you want a secure way, head over to one of the blog posts, Installing Terminus on Windows using a Virtual Machine.

First thing first, install WSL. Open up Powershell as an administrator.

Enable-WindowsOptionalFeature -Online -FeatureName Microsoft-Windows-Subsystem-Linux

Restart Windows.

After restarting go to Microsoft Store and search for “Linux”, select “Run Linux on Windows”. Pick Ubuntu and get it.

It would take a while for the installation process, you would be asked to provide a new username and password.

If you got to the Ubuntu shell, install the PHP repository

   sudo add-apt-repository ppa:ondrej/php 

Make sure we are getting all the recently updated software to be installed.

sudo apt-get update

Here are all the necessary libraries that we need.

sudo apt-get install curl php7.4 php7.4-curl php7.4-cli php7.4-mbstring php7.4-xml git unzip 

Install terminus

cd ~

mkdir terminus3

cd terminus3

curl -L https://github.com/pantheon-systems/terminus/releases/download/`curl --silent "https://api.github.com/repos/pantheon-systems/terminus/releases/latest" | perl -nle'print $& while m#"tag_name": "\K[^"]*#g'`/terminus.phar --output terminus

chmod +x terminus

sudo ln -s ~/terminus3/terminus /usr/local/bin/terminus

That’s it enjoy Terminus on Windows.