Terminus

How to Limit Access to WordPress Admin by IP Address

There are several ways to limit or restrict WordPress admin access by IP address.

Add some code to your wp-config file to restrict access to the WordPress admin area. Here are the steps:

  1. Log in to your website’s server using an FTP app like Filezilla or the file manager in your hosting control panel.
  2. Locate the wp-config file in the root directory of your WordPress installation.
  3. Download the wp-config.php file to your computer and open it in a text editor.
  4. Add the following code to the wp-config.php file:
/* Add any custom values between this line and the "stop editing" line. */

$ip_allowlist = [
   159.223.78.3,
   193.56.29.113,
   178.62.113.151,
   80.76.51.210,
   193.201.9.202,
   45.227.254.22,
];
$ip =  $_SERVER['REMOTE_ADDR'];

if ( preg_match( '/(wp-login.php)/', $_SERVER['REQUEST_URI'] ) ) {
    $ip_found = in_array( $ip, $ip_allowlist, true );

	if ( ! $ip_found ) {
		// Check if this IP is in CIDR 
		foreach ( $ip_allowlist as $_cidr ) {
			if ( strpos( $_cidr, '/' ) !== false ) {
				$_ip = ip2long( $ip );
				// expand the range of ips.
				list ( $_net, $_mask ) = explode( '/', $_cidr, 2 );
				// subnet.
				$_ip_net  = ip2long( $_net );
				$_ip_mask = ~( ( 1 << ( 32 - $_mask ) ) - 1 );
				if ( ( $_ip & $_ip_mask ) === ( $_ip_net & $_ip_mask ) ) {
					$ip_found = true;
					break;
				}
			}
		}
	}
	if ( ! $ip_found ) {
		header( 'HTTP/1.0 403 Forbidden' );
		exit;
	}
}

Replace xxx.xxx.xxx.xxx with the IP address that you want to allow access to the WordPress admin area. If you have multiple IP addresses, you can add one per line.

  1. Save the changes to the wp-config.php file.
  2. Upload the modified wp-config.php file back to your server, overwriting the original file.

After following these steps, only the specified IP addresses will have access to the WordPress admin area. Any other IP addresses trying to access the admin area will receive a 403 Forbidden error.

Alternatively, you can use the plugin Traffic Jammer that I wrote.

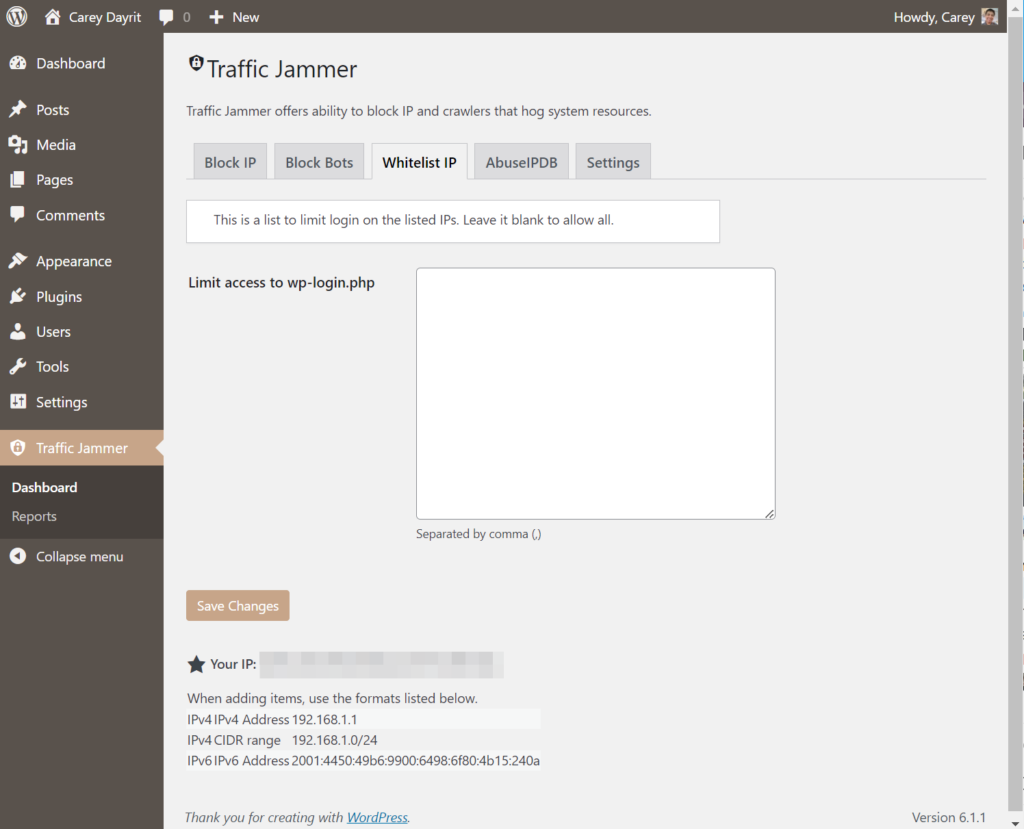
There is also a wp-cli command that is included in the plugin, here are the commands:

wp jam trust <IP> – add IP to the allowed list

wp jam untrust <IP> – remove IP from the allowed list

wp jam trustall – clear all limits

This plugin can also be used on the Pantheon terminus command, the plugin is very compatible with Pantheon no need to assume write access or symlinks to properly install the plugin.

terminus wp <sitename>.<env> -- jam <commands>

Team Management through Pantheon Terminus

Required Reading: https://pantheon.io/docs/terminus

What is Terminus?

The Terminus command-line interface provides advanced interaction with Pantheon. Terminus enables you to do almost everything in a terminal that you can do in the Dashboard, and much more. This article listed several commands in Terminus 2 that can be used in managing a site’s team using Terminus. First thing first, in all terminus commands we should know how to identify a site to manage it properly.

Getting the Site ID

The site id is an identifier of the site used to route and used by the Pantheon platform to identify the site’s dashboard. To get the site_id you need to login into Pantheon and pick the correct site, to be on the dashboard.

dashboard
URL of Pantheon Site Dashboard

Getting the Site Name

The site name is a machine name, which is a readable name used also to identify a site in Pantheon. The site name is used mostly with the platform URL.

List all team members

terminus site:team:list 

Displays the list of team members for a site. 

site:team:list [–format FORMAT] [–fields FIELDS] [–field FIELD] [–] <site_id> or <site_name>

The command accepts the <site_name> or the <site_id> of the Pantheon site.

The arguments –field and –fields are mostly the same, the difference is the field is just a single field while fields are a group of fields separated by comma(,).

  • email: Email
  • role: Role
  • id: User ID
  • is_owner: Is owner?

The available formats are, without the –format option the default is a table.

  • csv
  • json
  • list,
  • null
  • php,
  • print-r
  • sections
  • string
  • table
  • tsv
  • var_export
  • xml
  • yaml

Add a member

terminus site:team:add

Add a user to the site’s team list.

site:team:add <site_id/site_name> <member> <role>

The member argument should be an email if the email is not associated with a Pantheon account, an invite will be sent.

The role has two choices

  • developer
  • team_member

Change member role

terminus site:team:role

Update a member role on the site’s team.

site:team:role <site_id/site_name> <member> <role>

This command has the same arguments as the add member command but this would only change the role of a user on the site’s team.

Remove a member

terminus site:team:remove

site:team:remove <site_id/site_name> <member>

Removes a member from the site’s team

Installing Terminus on Windows using WSL 2

What is WSL? It stands for Windows Sub System for Linux. A Linux-compatible sub-system without having a need for a virtual machine. Though not entirely compatible that would run all the Linux commands and features it is good enough to install Terminus, the command-line tool from Pantheon.io.

A note of warning, since this instruction would require installing WSL, there is an article from TrendMicro a security flawed attack better read this first to be aware https://www.trendmicro.com/vinfo/us/security/news/cybercrime-and-digital-threats/bashware-attack-targets-windows-system-for-linux-wsl .

If you want a secure way, head over to one of the blog posts, Installing Terminus on Windows using a Virtual Machine.

First thing first, install WSL. Open up Powershell as an administrator.

Enable-WindowsOptionalFeature -Online -FeatureName Microsoft-Windows-Subsystem-Linux

Restart Windows.

After restarting go to Microsoft Store and search for “Linux”, select “Run Linux on Windows”. Pick Ubuntu and get it.

It would take a while for the installation process, you would be asked to provide a new username and password.

If you got to the Ubuntu shell, install the PHP repository

   sudo add-apt-repository ppa:ondrej/php 

Make sure we are getting all the recently updated software to be installed.

sudo apt-get update

Here are all the necessary libraries that we need.

sudo apt-get install curl php7.4 php7.4-curl php7.4-cli php7.4-mbstring php7.4-xml git unzip 

Install terminus

cd ~

mkdir terminus3

cd terminus3

curl -L https://github.com/pantheon-systems/terminus/releases/download/`curl --silent "https://api.github.com/repos/pantheon-systems/terminus/releases/latest" | perl -nle'print $& while m#"tag_name": "\K[^"]*#g'`/terminus.phar --output terminus

chmod +x terminus

sudo ln -s ~/terminus3/terminus /usr/local/bin/terminus

That’s it enjoy Terminus on Windows.

Installing Terminus on MacOS (Mojave)

This installation process needs to have Homebrew please do install it before doing the following steps. Homebrew installs the stuff you need that Apple did not.

Requirements:

  • Homebrew
  • PHP v7.3
    • php-cli
    • php-curl
    • php-mbstring
    • php-xml
  • Composer

Installation process

We need Homebrew to install the needed programs and libraries

/usr/bin/ruby -e "$(curl -fsSL https://raw.githubusercontent.com/Homebrew/install/master/install)"

After successfully installing Homebrew, it’s time to use ‘brew’ to install PHP

brew install [email protected]

Let’s try to download Composer, using the terminal.

curl -sS https://getcomposer.org/installer -o composer-setup.php
php composer-setup.php --filename=composer
sudo mv composer /usr/local/bin/composer

Then we can easily install Pantheon’s CLI tool, Terminus

composer require pantheon-systems/terminus
sudo ln -s /home/username/vendor/pantheon-systems/terminus/bin/terminus  /usr/local/bin/terminus

you need to replace /home/username with the actual username of the machine.

Then let’s try to authenticate.

terminus auth:login --machine-token=‹machine-token›

That’s it, happy coding.

Installing Terminus on Ubuntu 18.04.4

The Terminus command-line tool of Pantheon.io can easily be installed on Ubuntu 18.04.4 (Bionic Beaver).

Install the dependencies and requirements, since Terminus is written in PHP scripting language, the minimum version requirement 5.6 running it on PHP v7.3 is much faster.

The PHP extensions needed are:

  • curl
  • cli
  • mbstring
  • xml

PHP v7.3

sudo -A add-apt-repository ppa:ondrej/php -y;
sudo apt-get update

Dependencies and Requirements

sudo apt-get install curl php7.3 php7.3-curl php7.3-cli php7.3-mbstring php7.3-xml git unzip -y

Composer (skip if the machine in use has a prior composer installed.)

curl -sS https://getcomposer.org/installer -o composer-setup.php
php composer-setup.php --filename=composer
sudo mv composer /usr/local/bin/composer

Install Terminus via Composer

composer require pantheon-systems/terminus

Then in order that terminus can be executed on all folders, create a symlink that can be accessed.

sudo ln -s /home/vagrant/vendor/pantheon-systems/terminus/bin/terminus  /usr/local/bin/terminus

Test that it is properly installed

terminus -v

Authenticate

terminus auth:login --machine-token=‹machine-token›