Carey

WinSCP on Pantheon

WinSCP is a popular free SFTP and FTP client for Windows, a powerful file manager that allows you to upload and download files on the Pantheon server. It provides a user-friendly interface for copying files between a local and remote computer using the FTP or SFTP protocol. This software is available only on Microsoft Windows.

Main Features

  • All common operations with files
  • Graphical Interface
  • Integrated text editor
  • Scripting and task automation
  • Translated into many languages

A complete WinSCP guide and an active user forum are freely accessible at the WinSCP site.

Download WinSCP

If you don’t already have WinSCP installed on your computer, download the most recent update and install it from their website.

Open WinSCP

Open WinSCP by accessing the application on the Windows Start menu. Make sure you have your site’s Pantheon SFTP connection information on hand. See the guidelines on how to find the SFTP credentials for your site if you need to get the connection details.

WinSCP

Enter the details from the Site Dashboard Connection Info from Pantheon. Use the password that is being used when logging into the Pantheon User Dashboard. Do check the protocol must be in SFTP and the port number is 2222.

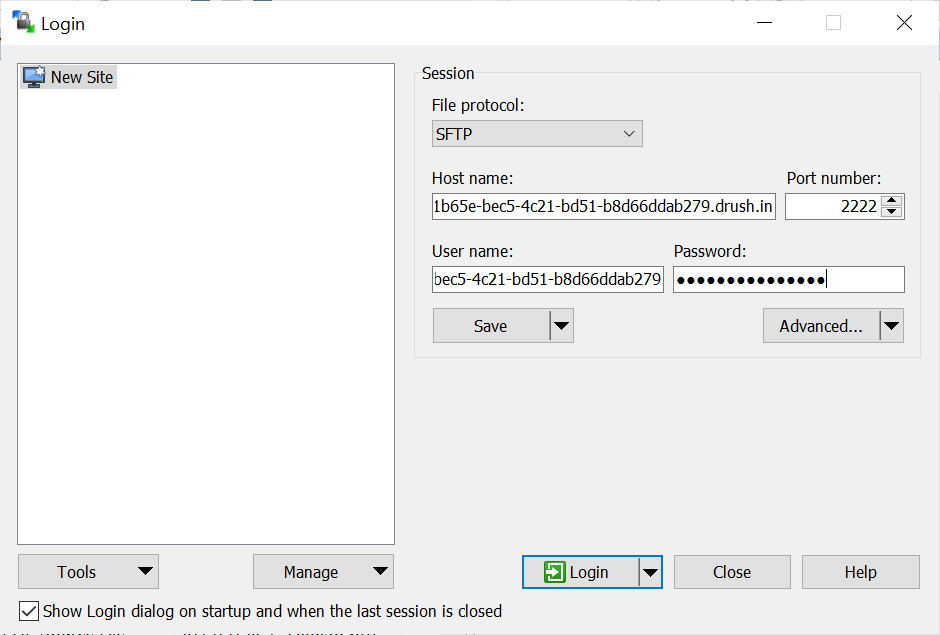
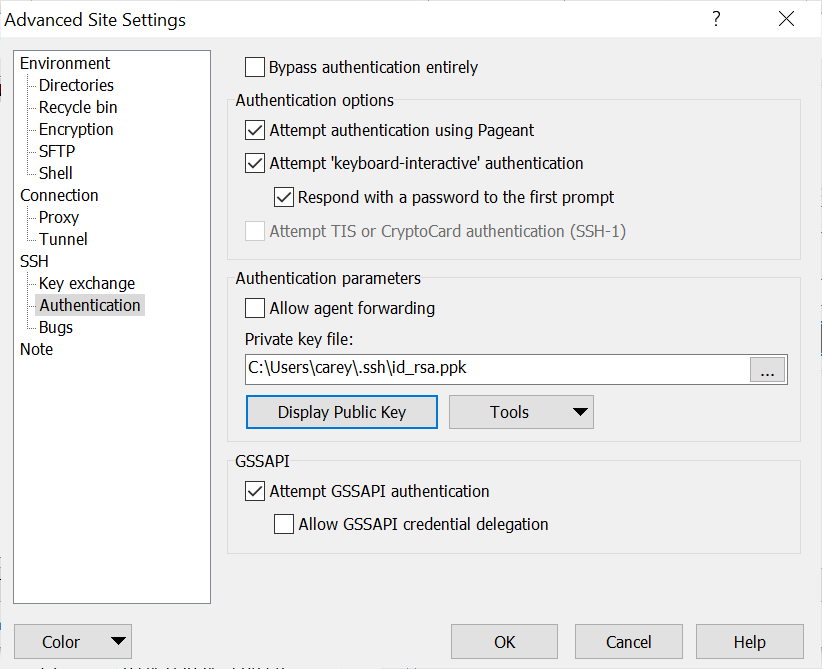
Alternatively, you can also have passwordless access by using an SSH private key. Pantheon doesn’t offer SSH access to a shell environment but it allows it to be used on SFTP protocol.

You should add your public SSH key into your Pantheon account to get the most out of it. SSH keys are a better option for authentication than a basic password since they provide additional security protection. No matter how many sites you work on, you will only need to do this once. See Generate and Add SSH Keys for further information.

Click the Advanced select button, under SSH then click Authentication. Enter a private key in PPK format.

To get the site’s root simply navigate to the code folder and you will be able to download and upload files as normal.

Protecting WordPress login page thru Basic Authentication

Take steps to avoid brute force attacks on the WordPress admin dashboard page. This would add an additional layer to site security and avoid traffic excess. Basic Authentication would facilitate HTTP requests to require a username and a password.

Add Basic Authentication via .htaccess

This is applicable to sites using Apache as the web server, this would not work on hosts with Nginx as their web server. Two simple steps:

Create a .htpasswd file then upload it to your webroot folder, this is the folder mostly where “.htaccess" resides.

Add this line to your .htaccess file

<Files wp-login.php>
AuthUserFile /.htpasswd
AuthName "Security Lock"
AuthType Basic
require valid-user
</Files>

Add Basic Authentication on the wp-config.php file

Sometimes as customers don’t have access to server configuration and PHP would be the fallback method.

if(preg_match('/(wp-login.php)/',$_SERVER['REQUEST_URI'])){
    if (!isset($_SERVER['PHP_AUTH_USER']) || ( $_SERVER['PHP_AUTH_USER'] != 'yourusername' && $_SERVER['PHP_AUTH_PW']   != 'yourpassword')) {
	    header( 'Cache-Control: no-cache, must-revalidate, max-age=0' );
	    header( 'WWW-Authenticate: Basic realm="Security Lock"' );
        header( 'HTTP/1.0 401 Unauthorized' );          
        exit();          
     }
}

Skipping WordPress Background Updates

What is Site Health?

The WordPress admin interface is designed to assist end-users in self-servicing their sites by addressing typical setup difficulties and other aspects of maintaining a healthy online presence. It also gives developers a consistent place to store debugging information.

SiteHealth Dashboard

Why the need to skip background updates?

Some hosts, specially Pantheon.io handle the core updates by means of applying upstream updates, or in some common practice, more sites are now in version control using git. Site owners don’t want to ignore the whole time and miss out on potential problems.

Code snippet to skip the update

Create a file named sitehealth.php put it in wp-content/mu-plugins and put these lines of code.

<?php
/**
 * Plugin Name: Sitehealth 
 * Plugin URI: https://github.com/careydayrit/
 * Description: Skip core update on sites using Git
 * Version: 0.1
 * Author: Carey Dayrit
 * Author URI: https://careydayrit.com/
 *
 * @package sitehealth
 */
 
add_filter('site_status_tests', 'skip_background_updates_tests', 10, 1 );


function skip_background_updates_tests($tests){
    unset($tests['async']['background_updates']);
    return $tests;
}

Team Management through Pantheon Terminus

Required Reading: https://pantheon.io/docs/terminus

What is Terminus?

The Terminus command-line interface provides advanced interaction with Pantheon. Terminus enables you to do almost everything in a terminal that you can do in the Dashboard, and much more. This article listed several commands in Terminus 2 that can be used in managing a site’s team using Terminus. First thing first, in all terminus commands we should know how to identify a site to manage it properly.

Getting the Site ID

The site id is an identifier of the site used to route and used by the Pantheon platform to identify the site’s dashboard. To get the site_id you need to login into Pantheon and pick the correct site, to be on the dashboard.

dashboard
URL of Pantheon Site Dashboard

Getting the Site Name

The site name is a machine name, which is a readable name used also to identify a site in Pantheon. The site name is used mostly with the platform URL.

List all team members

terminus site:team:list 

Displays the list of team members for a site. 

site:team:list [–format FORMAT] [–fields FIELDS] [–field FIELD] [–] <site_id> or <site_name>

The command accepts the <site_name> or the <site_id> of the Pantheon site.

The arguments –field and –fields are mostly the same, the difference is the field is just a single field while fields are a group of fields separated by comma(,).

  • email: Email
  • role: Role
  • id: User ID
  • is_owner: Is owner?

The available formats are, without the –format option the default is a table.

  • csv
  • json
  • list,
  • null
  • php,
  • print-r
  • sections
  • string
  • table
  • tsv
  • var_export
  • xml
  • yaml

Add a member

terminus site:team:add

Add a user to the site’s team list.

site:team:add <site_id/site_name> <member> <role>

The member argument should be an email if the email is not associated with a Pantheon account, an invite will be sent.

The role has two choices

  • developer
  • team_member

Change member role

terminus site:team:role

Update a member role on the site’s team.

site:team:role <site_id/site_name> <member> <role>

This command has the same arguments as the add member command but this would only change the role of a user on the site’s team.

Remove a member

terminus site:team:remove

site:team:remove <site_id/site_name> <member>

Removes a member from the site’s team

Using WordPress for eCommerce

Because of this pandemic, the number of people shopping online has multiplied, and it is still rising to this very moment. With nothing else to do, people tend to visit websites that are selling products that they usually want to buy, such as shoes, dresses, electronic devices, and many more. In this article, you will learn Steps on How to Use WordPress as an eCommerce Store.

Knowing that online shopping is a trend, especially in these times, a lot of people want to get involved with it and would want to know how to create an E-commerce store. Well, then let me teach you how to create your very own eCommerce store by using WordPress. Let’s get started then! 

1. Get a Domain Name and a Hosting Provider

Before you can create a website, it is important to have a hosting provider and a domain name first. Your domain name is what appears on the top bar of your browser, just like this:

domain

Some companies only provide domain name registration, but the majority provide both domain name and web hosting services. Some of the commonly good registrars are Domain.com, GoDaddy, and NameCheap. I would not recommend NetworkSolutions though they are fairly good, they don’t support adding IPv6 on their user interface, you need to email them to have IPv6 value to be added to the domain, they called it glue record. Think carefully about your domain name, because it is how people are going to reach your website.

There are hundreds of thousands of web servers available, the most majority of which match the WordPress basic criteria, but picking one out of the crowd can be difficult. WordPress thrives in a rich hosting environment, it would also depend on the requirement of the application, not all hosting is created equal.

For the hosting provider, I suggest that you use Bluehost.com because WordPress.org officially recommends them. All you have to do is go to their website, bluehost.com, fill up the form, and you are good to go. You can also create your domain name on the site.

After creating your account, there will be a button there that indicates “start building”. Click that button, and you will be taken to the back end of your WordPress account.

2. Install WordPress and choose a Theme

Right after you’ve chosen a Host Provider and a domain name for your eCommerce website, you will then have to secure your WordPress website. You can look it up on Youtube to know-how. Now that you are in your WordPress already, the first thing that you must do is to change the theme. The suggested theme that everyone seems to be using is the Astra theme. This theme is basically what other online store websites look like and I’m sure that it is the website that you want to follow.

Astra is a fast, highly customizable, and super clean theme that is designed to convert better and boost your store’s sales. This is the them

3. Install the Woocommerce plugin

WooCommerce is a flexible, open-source commerce solution built on WordPress.  Based on the plugin page on the WordPress.org website, WooCommerce has over 5 million active installations. It is the most customizable eCommerce platform for building your online business.

Screenshot from the plugin page

WooCommerce isn’t like Shopify or BigCommerce in that it’s not a standalone hosted eCommerce platform. It’s a plugin, or extension, for websites developed using WordPress, the free and open-source content management system that powers the vast majority of websites around the world. It’s simple to get started with WooCommerce once you’ve started creating your website because it’s a plugin. Here’s the URL to their guide https://woocommerce.com/documentation/