PHP

Optimize Database Performance – Cleaning WP Options Table

We all know WordPress is an application written in PHP and paired with MySQL or MariaDB database. The PHP language reads or writes to the database. This happens on every WordPress request, for example, like the home page that makes up links, content, theme, or plugin, there is always a call in the database.

One database table, in particular, that is overly used on this request is the WP Options table. The WP Options table stores the site data, when this table gets large this will contribute to sluggish response time. Cleaning the WP Options table can improve page generation speed.

Image from https://codex.wordpress.org/Database_Description

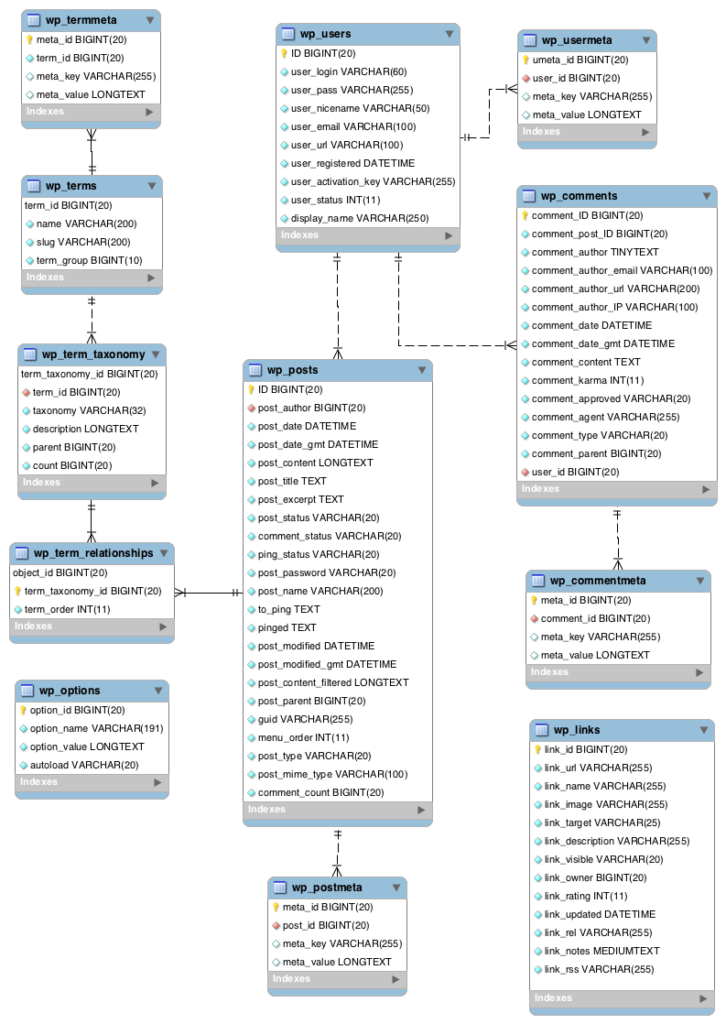
This is the only table on the database that is alone or without any table relationship, assuming it would add load if this is linked to another table, a flat table by design. Here is the table definition:

CREATE TABLE `wp_options` (
  `option_id` bigint(20) unsigned NOT NULL AUTO_INCREMENT,
  `option_name` varchar(191) COLLATE utf8mb4_unicode_ci NOT NULL DEFAULT '',
  `option_value` longtext COLLATE utf8mb4_unicode_ci NOT NULL,
  `autoload` varchar(20) COLLATE utf8mb4_unicode_ci NOT NULL DEFAULT 'yes',
  PRIMARY KEY (`option_id`),
  UNIQUE KEY `option_name` (`option_name`),
  KEY `autoload` (`autoload`)
) ENGINE=InnoDB;
FieldTypeNullKeyDefaultExtra
option_idbigint(20) unsignedPrimaryauto_increment
option_namevarchar(191)Unique
option_valuelongtext
autoloadvarchar(20)Indexyes

By design, three out of one are indexed properly for an optimized SELECT query.

Removing Transients

Transients are temporary data of plugins and themes stored on the WP Options table. Usually, this has expiration dates but if the plugin has been deactivated or uninstalled the value on the table would remain in the database forever. Transients can be easily identified since a “transient” word can be found in the field option_name. To remove execute a DELETE SQL statement.

DELETE FROM wp_options WHERE option_name LIKE ('%\_transient\_%');

Removing Sessions

Sessions are temporary data that is generated from every user visit. This will be automatically be deleted after thirty minutes of user inactivity but that is not the case all the time. Manual removal is needed to clean up the session’s data.

DELETE FROM wp_options WHERE option_name like '_wp_session_%';

Block IP Addresses in WordPress

There are several reasons that might need to block an IP address from accessing the site. I’ve categorized the reasons in no particular order:

  • Unnecessary traffic
  • Spam
  • Brute Force Attack
  • DDoS Attack

Unnecessary traffic

Usually, this is traffic generated by bots crawling the site, they might be good or bad bots. A bot is considered good when it would adhere or follow what’s on the robots.txt file, the other one would just ignore the contents. There are also some email harvesters, content scrapers, and web extractors. This adds bandwidth and sometimes hinders the loading of the site.

Spam

Spam is unwanted messages, usually on form submissions like contact forms, registration pages, and comment pages. They sometimes become annoying since the query does not come from legitimate users or customers. On server access logs most of them come with a single IP.

Brute Force Attack

A brute force attack is a series of login attempts trying to guess the password. There are many methods of doing this, one is doing all the combinations to log in, another is using a dictionary of known weak passwords. Access to the wp-admin dashboard is really plenty on server access logs.

DDoS Attack

DDoS is an acronym for Distributed Denial of Service. The DDoS attack utilizes several IP addresses that send multiple requests with the aim to exceed the bandwidth and limit access to a website.

Blocking an IP using a plugin

The most sophisticated plugin for securing a WordPress site is Wordfence. Wordfence features a built-from-the-ground-up endpoint firewall and malware scanner to secure WordPress. Wordfence gets the latest firewall rules, malware signatures, and malicious IP addresses from its Threat Defense Feed, so it can keep the website secure. Wordfence is the most robust WordPress protection system today, with 2FA and a suite of additional tools.

Here are other plugins worth considering in blocking IP:

Blocking an IP in Server Configuration

On Apache servers, this can be done by adding Deny keyword on .htaccess

# Block Single IP
Deny from 192.168.254.1

# Block Entire Subnet
Deny from 192.168

# Block using CIDR
Deny from 192.168.254.0/24

On Nginx servers, add access.conf file on Nginx configuration folder.

location / {
   deny 192.168.254.1;
 }

After adding, reload the configuration or restart Nginx.

Blocking an IP by using PHP

Use a PHP snippet to block IP, the best way to put the code on wp-config.php, the server would deny the IP before bootstrapping the core, plugins, and themes.

if ($_SERVER['REMOTE_ADDR'] == '192.168.254.1') {
  header('HTTP/1.0 403 Forbidden');
  exit;
}

Wrapping UP

I think the best method to use is the server configuration and PHP code inclusion. Even if the site is experiencing a DDoS attack, the Server and PHP code can be added instantly.

Installing WP Rocket on Pantheon Platform

Some people do find a hard time installing WP Rocket on Pantheon since it creates files on a write-protect folder set by Pantheon Platform.

The solution was to create a symlink and point to the write permitted folder which is the wp-content/uploads folder.

Please take note that this step is not recommended to be used on any SFTP app but only on the SFTP command line. Since creating symlinks over SFTP have inconsistencies between clients. The process below was tested using MacBook Pro (Mojave), Ubuntu 18.04.4 LTS, and Windows 10 (Release 1909)

  • Create a folder cache and wp-rocket-config on wp-content/uploads folder on DEV first (later would be TEST and LIVE).
  • Remove the wp-content/cache folder. If there is a wp-content/wp-rocket-config folder, remove it also.
  • Create a symlink via the terminal command line.

Note: Be sure that you are in the wp-content folder.

$ ln -s ./uploads/cache cache
$ ln -s ./uploads/wp-rocket-config wp-rocket-config
  • Commit and push the symlink via git.
  • Create the folder cache and wp-rocket-config in wp-content/uploads​ for TEST and LIVE.
  • Commit and deploy code to TEST and LIVE.
  • Activate the WP-Rocket plugin and apply the license code.

Hopefully, this will help users install the WP-Rocket Plugin on the Pantheon Platform.

Happy Coding.