Wordpress

How to Start a Blog?

Nowadays, almost everyone has a blog. Blogging has been going on for years, and some people might say that blogs are outdated since the majority of people navigate more towards social media platforms like Facebook, Youtube, and Instagram. But I think otherwise. Blog contents are full of helpful and reliable information since most bloggers are experts or have experience in their specific niches.

Here’s how to start a blog:

  1. Choose your niche
    Choose a niche that you are passionate about. Don’t be afraid to narrow down to specific niches. This way, you can quickly write and create blog posts relating to your topic. Not only that, but you will also reach specific audiences for your blog.  For example, your niche is about mental health specifically about anxiety, so you will be tackling about dealing, overcoming anxiety, etc.
  2. Maintain a consistent schedule of your posts.
    No one is going to follow your blog if it is inconsistent, like uploading at a different time and date. Having a consistent schedule, let’s say you will post your articles every Wednesday night, makes the people would want to check out your blog every Wednesday night. This way, you can build trust and rapport with your audience. 

    Consistent postings will boost your SEO (Search Engine Optimization). Google loves consistency. You can easily rank at the top when people search for specific keywords relating to your blog posts. SEO is a bit of a complicated topic. Still, there are tons of learning materials available online, and later on, you can improve in optimizing your SEO for better opportunities for your blog.
  3. Make a website.
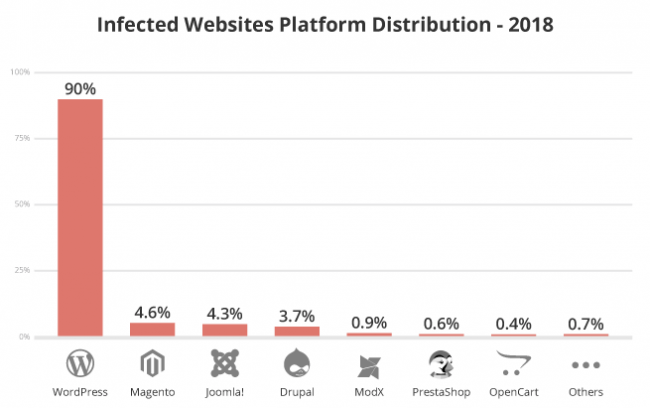
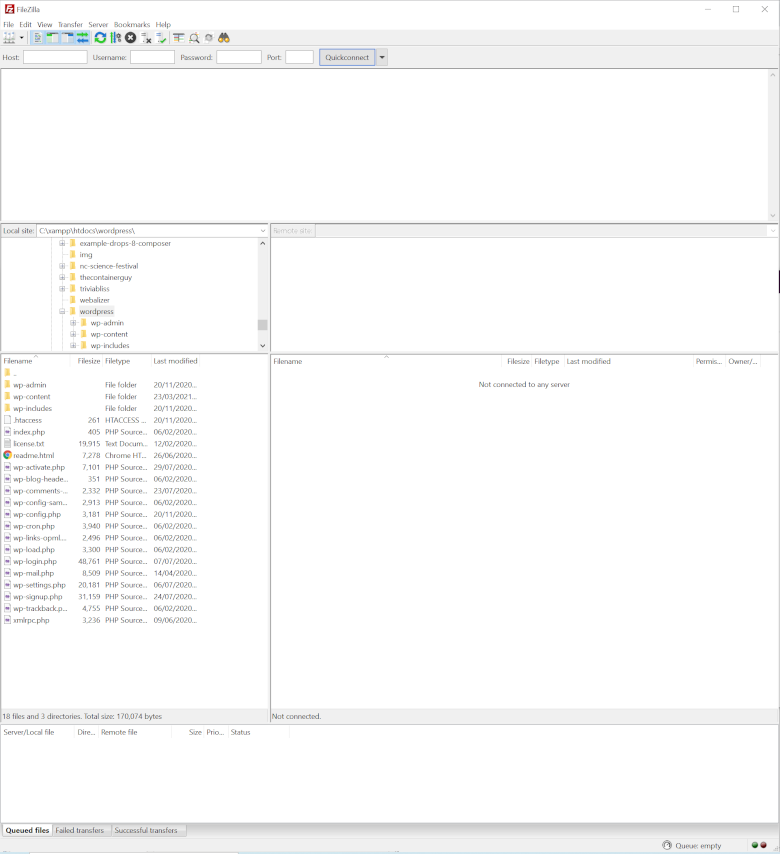
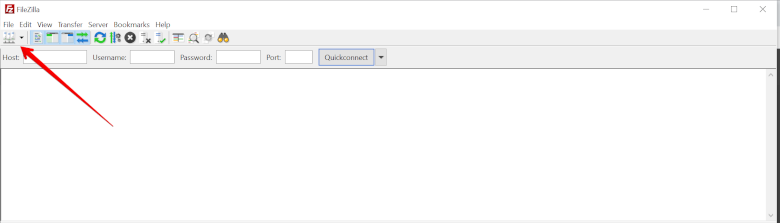
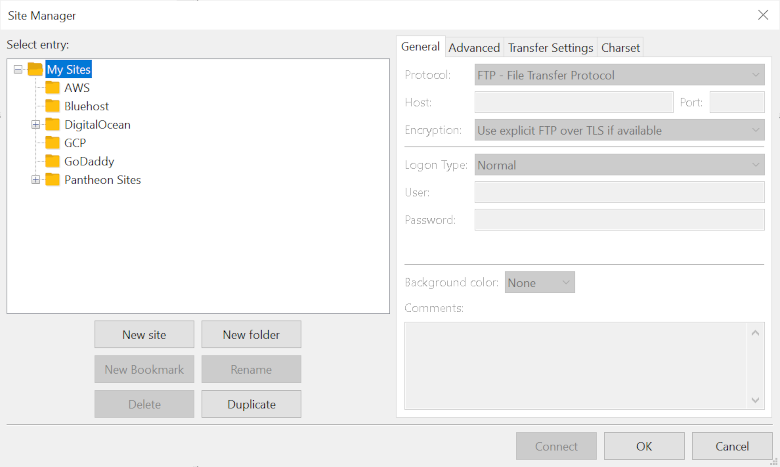
    The best blogging platform is WordPress. There are also alternative blogging platforms you can try such as Squarespace, Blogspot, and many more. Personally, I would prefer using WordPress because WordPress has earned its SEO benefits from Google, giving you more opportunities for monetizing your blog. However, WordPress is a bit of a complicated platform to use, but there are many tutorials available online where you can learn from, or you can opt to hire a WordPress developer if it’s too hard for you. 
  4. Monetizing your blog by using affiliate links.
    One way to earn from your blog is by hooking up your blog with affiliates. Setting up with affiliates is like advertising someone’s product. For example, your recent article is about “Ways on How to Cope up with Insomnia,” in your blog post, you included a particular ointment that you got from Amazon and embedded the link to your blog post. If that article reaches a thousand views and followers, then you can rank up on Google and, at the same time, earn from affiliates that will reach out to you. To get more on affiliate marketing, you can learn this yourself or hire a marketing specialist.
  5. Keep updated.
    You have to keep yourself updated on what’s new and trendy on social media to avoid having an outdated blog. For example, the current trend is all about the global pandemic, and luckily, as a mental health blogger, your articles will have a better chance of ranking up on Google and have more traffic for your blog. In a global pandemic situation, everyone needs to be mentally healthy, so you are at an advantage. 

    Blogging is a product of passion, a passion that could lead you to income. However, blogging doesn’t mean it is exclusive only for earning. Instead, think of blogging as an expression of one’s character and a platform where people share their knowledge with others. You want to start a blog, right? Then take action now! You might become a successful blogger someday!

The need for WordPress Security

WordPress site owners would just leave site security on the least priorities on their checklist.  The common things they are going for are an affordable host, an appealing design, SEO, promotion, and custom development.  They would not prioritize the security of their site, sadly according to an article from ZDNet.com, WordPress accounted for 90 percent of all hacked CMS sites in 2018.  Two-thirds of them were hacked due to a backdoor from an outdated plugin or a known vulnerability.

(image from Sucuri)

Remember a website is a digital asset; any disruption would result in loss of lead, conversion, and sale.  That means a loss of revenue, imagine if a site that earns an average of $100 per day, a disruption of five days would result in a loss of $500, the same scenario on a site that was dropped off on search engine rankings.   Google Ad would not permit adding websites if their algorithm detected a possible malware infection.   In the worst scenario, Chrome would not allow the viewing of the site and would make a bad impression on customers.   Expensive Design, SEO, Social Marketing, Sales Funnel, or landing pages would not be of help once a WordPress website is hit by malware.  So it’s better to be protected than sorry.

Filezilla on Pantheon

FileZilla is an FTP client that allows you to upload and import files to and from the Pantheon server. This app allows you to copy several files at the same time. It is a cross-platform software that is available on Windows, Mac OS, and Linux.

This article will walk you through the steps of downloading and uploading your WordPress or Drupal site on Pantheon.

Download Filezilla

If you don’t already have FileZilla installed, grab the most recent update and install it on your computer.

Start Filezilla

Start FileZilla by looking for the application on the start menu or search bar on Windows, on the applications folder on Mac OS, and search for Ubuntu. Keep in mind that Pantheon uses a non-standard port for SFTP, and the protocol must be SFTP rather than FTP.

Create a New Site

Click the Site Manager Icon, that would be the Icon under the File menu.

This would prompt the Site Manager window that would allow a new connection to be made on Filezilla.

Click the New Site button and put details from the Site Dashboard Connection Info from Pantheon. Use the password that is being used on Pantheon User Dashboard. Make sure the Protocol is in SFTP and is using port 2222.

Select to accept the server’s host key for the current session so it is stored in the cache. This will allow you to connect to the server and manage your files for the current session.

To get to the site’s root simply navigate to the code folder and you will be able to continue managing your files as normal.

Block IP Addresses in WordPress

There are several reasons that might need to block an IP address from accessing the site. I’ve categorized the reasons in no particular order:

  • Unnecessary traffic
  • Spam
  • Brute Force Attack
  • DDoS Attack

Unnecessary traffic

Usually, this is traffic generated by bots crawling the site, they might be good or bad bots. A bot is considered good when it would adhere or follow what’s on the robots.txt file, the other one would just ignore the contents. There are also some email harvesters, content scrapers, and web extractors. This adds bandwidth and sometimes hinders the loading of the site.

Spam

Spam is unwanted messages, usually on form submissions like contact forms, registration pages, and comment pages. They sometimes become annoying since the query does not come from legitimate users or customers. On server access logs most of them come with a single IP.

Brute Force Attack

A brute force attack is a series of login attempts trying to guess the password. There are many methods of doing this, one is doing all the combinations to log in, another is using a dictionary of known weak passwords. Access to the wp-admin dashboard is really plenty on server access logs.

DDoS Attack

DDoS is an acronym for Distributed Denial of Service. The DDoS attack utilizes several IP addresses that send multiple requests with the aim to exceed the bandwidth and limit access to a website.

Blocking an IP using a plugin

The most sophisticated plugin for securing a WordPress site is Wordfence. Wordfence features a built-from-the-ground-up endpoint firewall and malware scanner to secure WordPress. Wordfence gets the latest firewall rules, malware signatures, and malicious IP addresses from its Threat Defense Feed, so it can keep the website secure. Wordfence is the most robust WordPress protection system today, with 2FA and a suite of additional tools.

Here are other plugins worth considering in blocking IP:

Blocking an IP in Server Configuration

On Apache servers, this can be done by adding Deny keyword on .htaccess

# Block Single IP
Deny from 192.168.254.1

# Block Entire Subnet
Deny from 192.168

# Block using CIDR
Deny from 192.168.254.0/24

On Nginx servers, add access.conf file on Nginx configuration folder.

location / {
   deny 192.168.254.1;
 }

After adding, reload the configuration or restart Nginx.

Blocking an IP by using PHP

Use a PHP snippet to block IP, the best way to put the code on wp-config.php, the server would deny the IP before bootstrapping the core, plugins, and themes.

if ($_SERVER['REMOTE_ADDR'] == '192.168.254.1') {
  header('HTTP/1.0 403 Forbidden');
  exit;
}

Wrapping UP

I think the best method to use is the server configuration and PHP code inclusion. Even if the site is experiencing a DDoS attack, the Server and PHP code can be added instantly.

Installing WP Rocket on Pantheon Platform

Some people do find a hard time installing WP Rocket on Pantheon since it creates files on a write-protect folder set by Pantheon Platform.

The solution was to create a symlink and point to the write permitted folder which is the wp-content/uploads folder.

Please take note that this step is not recommended to be used on any SFTP app but only on the SFTP command line. Since creating symlinks over SFTP have inconsistencies between clients. The process below was tested using MacBook Pro (Mojave), Ubuntu 18.04.4 LTS, and Windows 10 (Release 1909)

  • Create a folder cache and wp-rocket-config on wp-content/uploads folder on DEV first (later would be TEST and LIVE).
  • Remove the wp-content/cache folder. If there is a wp-content/wp-rocket-config folder, remove it also.
  • Create a symlink via the terminal command line.

Note: Be sure that you are in the wp-content folder.

$ ln -s ./uploads/cache cache
$ ln -s ./uploads/wp-rocket-config wp-rocket-config
  • Commit and push the symlink via git.
  • Create the folder cache and wp-rocket-config in wp-content/uploads​ for TEST and LIVE.
  • Commit and deploy code to TEST and LIVE.
  • Activate the WP-Rocket plugin and apply the license code.

Hopefully, this will help users install the WP-Rocket Plugin on the Pantheon Platform.

Happy Coding.